Hi, I have just bought Nuitrack and so far so good.
I would like to mix RGB stream using Color Frame Canvas prefab with Render Mode set to Screen Space - Camera. Now I would like to match the character in scene, avatar driven by Nuitrack skeletal tracking with this image in a way they match. Basically, I would like to put cloths simulated in Unity onto video image of people. How can I do such a thing?
To do this, you have to change some parameters of the camera on the scene:
Set the camera to (0,0,0) and rotate it by 180 degrees(0,180,0);
If the model size is incorrect, change FOV of the camera;
Please use the model with direct mapping of joints. Such model is used on our RiggedModel2 scene. Make sure that your Canvas doesn’t overlap the model.
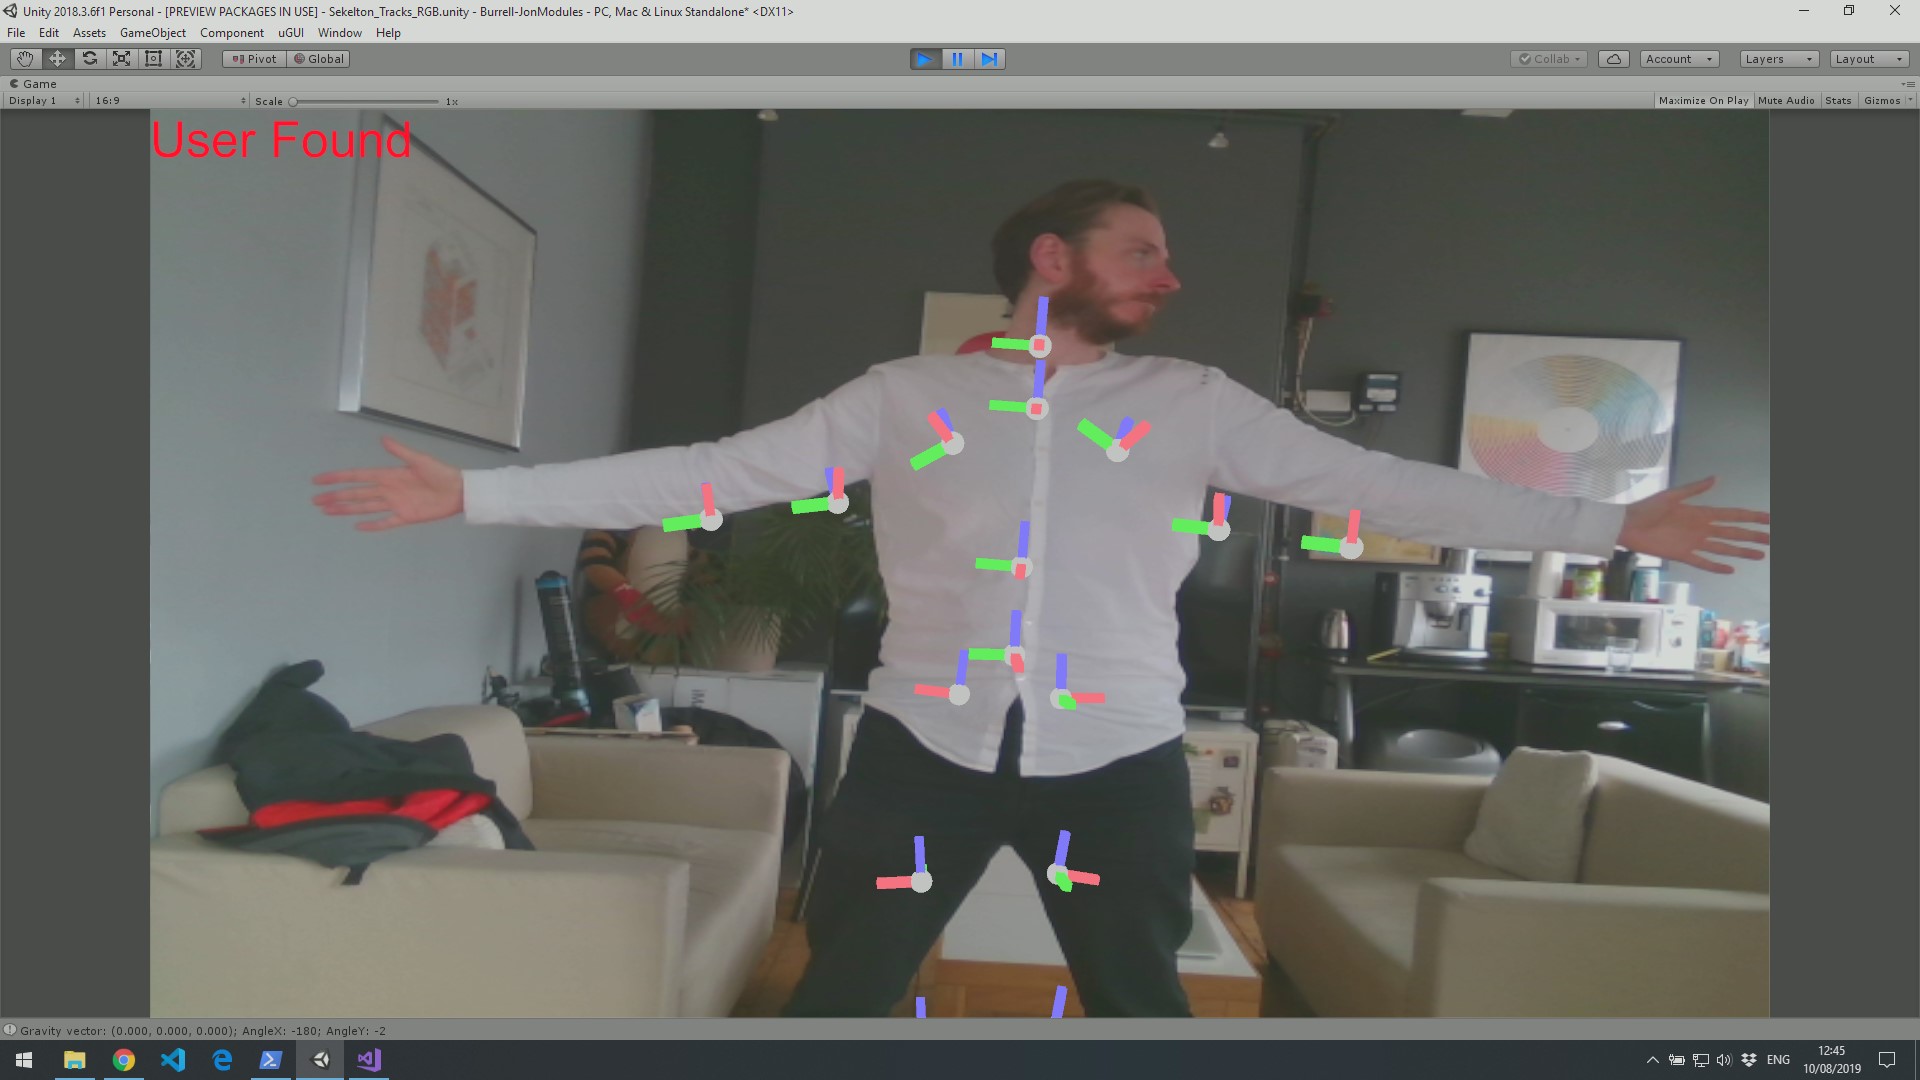
I’m creating something similar where I need joints in 3D space to line up with the person on the RGB feed in the back ground but instead of controlling an avatar we’ll be pinning things to them.
I’ve made sure I’m orienting the joints in the same way you do in your example and followed the rest of the advice above but I’m having a real struggle getting them to line up.
I’ve also noticed the head joint doesn’t rotate when I turn my head which is a problem since the app I’m making needs to pin armour and a helmet to the user. Is this correct behaviour? If so I assume my best way around this would be to use the skeleton head joint for the position of the helmet and use your face tracking API to get the face angle to rotate it.
I’m jumping ahead though there, because if I can’t get the skeleton joints to line up with the user in the RGB feed it’s not going to work anyway.
I’ve ran the demo project you posted above with the Unity Chan avatar and get the same problem, even after tweaking the camera position/rotation/FOV to try and get it to line up. Anything I do that gets the wrist joints placed wide enough apart to line-up, results in all the other joints then being out of place.
I feel like the points are never going to match properly because the image is being stretched to fill the screen. Is that the case or have you had this demo working perfectly? Maybe I need to scale the skeletons parent object by the same scale the image is being stretched?
If you have any advise you could give to solve this problem I’d be very grateful.
I’m using a Realsense D415 with this if that makes a difference.
Hi all,
I’m also trying to align the skeleton with the RGB image in Unity but I’m not able to get it right.
I’m using a RealSense D435i depth-sensing camera.
I have the ‘Depth2ColorRegistration’ in ‘nuitrack.config’ set to ‘true’.
I set the camera horizontal FOV to 69.4 and I’m using a RawImage as described in the “Displaying Skeletons on an RGB Image” tutorial.
I’m using the ‘Assets/NuitrackSDK/Tutorials/Avatar Animation/Scripts/RiggedAvatar.cs’ script that I think is the one used in ‘RiggedModel2.scene’.
I’m using a model from MakeHuman with a CMU compliment rig and rendered using a ‘Skinned Mesh Renderer’.
The skeleton is working fine, it’s just the alignment that I’m not getting right. Any more suggestions?
Perhaps the issue is connected to positioning in RiggedAvatar.cs (try to use the calibration script from Nuitrack SDK at startup of your project to align the skeleton)
The set FOV of the camera does not match the FOV of the sensor.
RGB and Depth FOV are different for different sensor models, and Nuitrack doesn’t have access to FOV of a sensor. Unfortunately, we don’t have such tutorials (for a 3D model).
Yes, this should align depth frames and color frames, however, it’s still necessary to fine-tune a sensor and a model to match it with the background. We’ll consider making a tutorial on aligning RGB and Depth.
In order to improve the resulting point cloud, we recommend you to turn on depth-to-color registration because a depth map doesn’t accurately match an RGB image, therefore, they should be aligned. To turn on depth-to-color registration, open nuitrack.config from the folder <nuitrack_home>\data and set DepthProvider.Depth2ColorRegistration to true.
At the moment, we are preparing a tutorial “Rendering world object behind user”.
In this tutorial, you will see how to recreate a real-world environment in Unity with the correct depth map, as well as the ability to interact with objects on the stage ( AR ).
Scenes with examples from the tutorial will be available in the latest version of the Nuitrack SDK.