We’re happy to present our real-time body tracking for Unreal Engine 5. It could be used without writing any code, simply connecting Nodes in Blueprints
It’s perfect for developing games , fitness apps and other interactive projects with body tracking.
Get started with examples showing different Nuitrack capabilities:
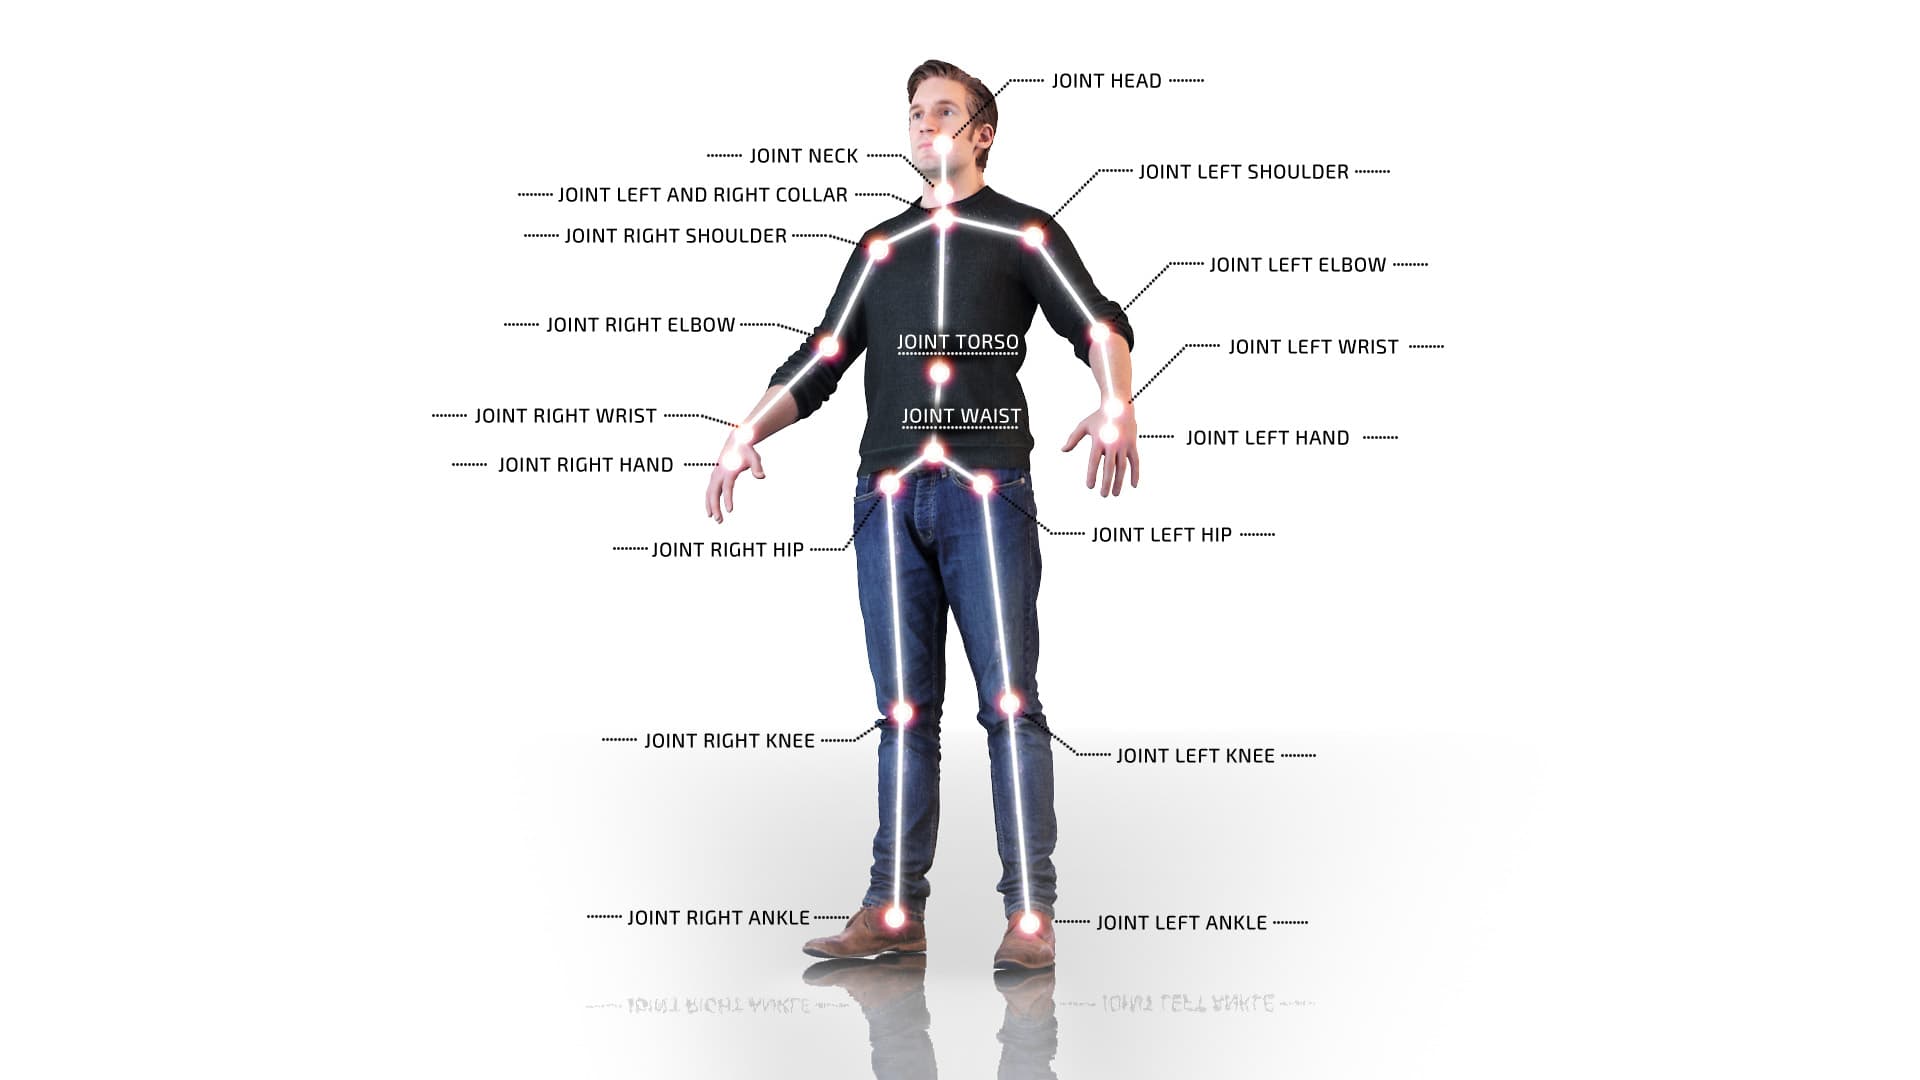
SkeletonJoints - check what the camera sees and how the skeleton joints are tracked
AvatarMannequin - animate a game character using Nuitrack skeleton
FittingRoom - how to create a virtual fitting room
GesturesDemo - demonstrates how the gesture recognition works
HandTracker - how to use hand tracking to interact with the UI
If you’re interested in Skeleton Tracking with Orbbec, RealSense or Kinect sensors (v1, v2, Azure) , you’re welcome to try out.
Do you want a new feature, tutorial, or something else? Fill out this FORM
A new version of the beta-plugin has been released:
Simplified Game Building. Now you don’t need to edit any files, just do the build.
Simplified Plugin Rebuilding. In README.txt (and first post) added instructions on what to do if Unreal Engine requests a rebuild. Check out the Plugin Rebuilding section
Removed errors from the output log that appeared at startup
The size of the plugin has been significantly reduced
Hello there, new text tutorial that will show How To Animate Avatar UE:
AnimationBlueprint
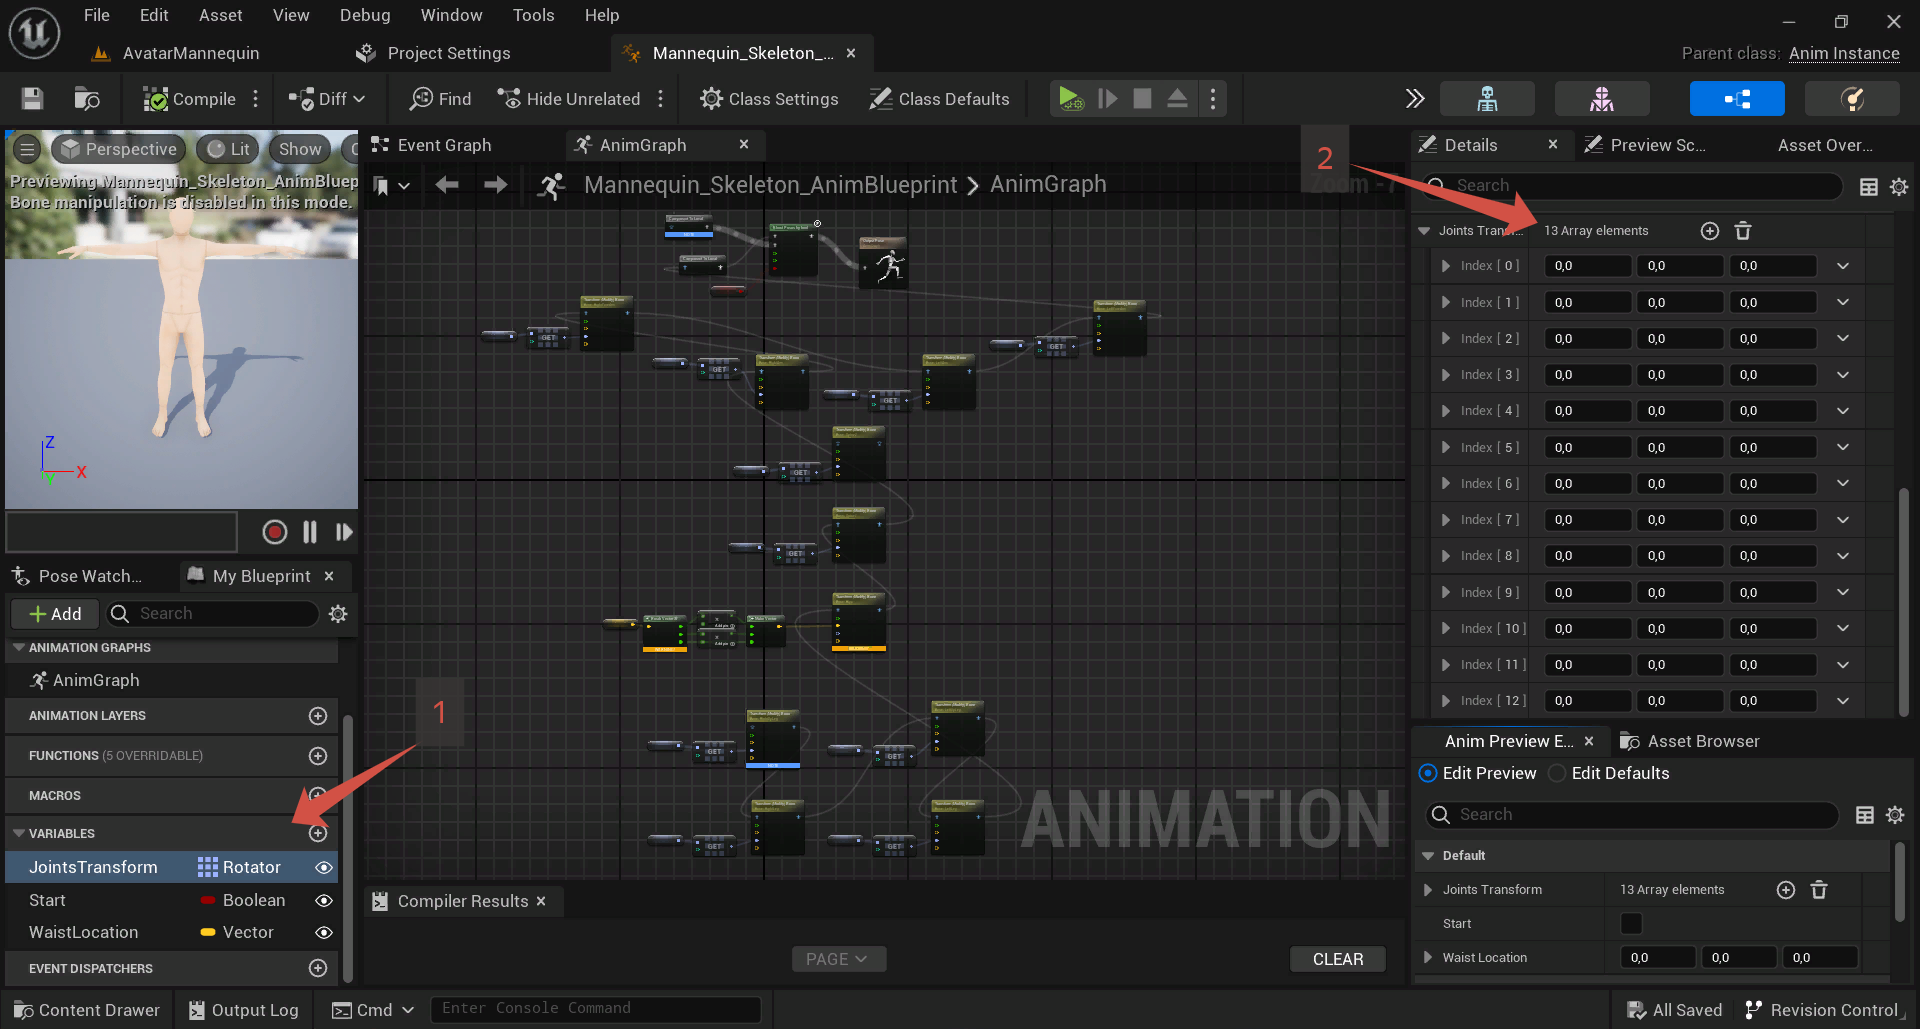
First of all, open Mannequin_Skeleton_AnimBlueprint
Look at what variables are here and pay attention to the initial values (especially the fact that JointsTransform is an array with 13 elements)
See how the blueprint animation is configured for this model. If you look closely, the nodes are made up in the shape of a person, two nodes for each arm, two for each leg, and nodes for the body. If you click on one, then in the first field (“Bone To Modify”) you can see which bone it rotate.
Then open or create an animation blueprint for your model. And create the same variables as in Mannequin_Skeleton_AnimBlueprint.
And copy the nodes from Mannequin_Skeleton_AnimBlueprint to this one, then connect them according to the sample from that file, do not forget to select the desired, previously mentioned, “Bone To Modify” in each node.
To make sure that everything is done correctly. Select the Start value, apply and recompile. If the model assumes a strange pose, then the values of the turns of the bones change. Disable the “Start” value back
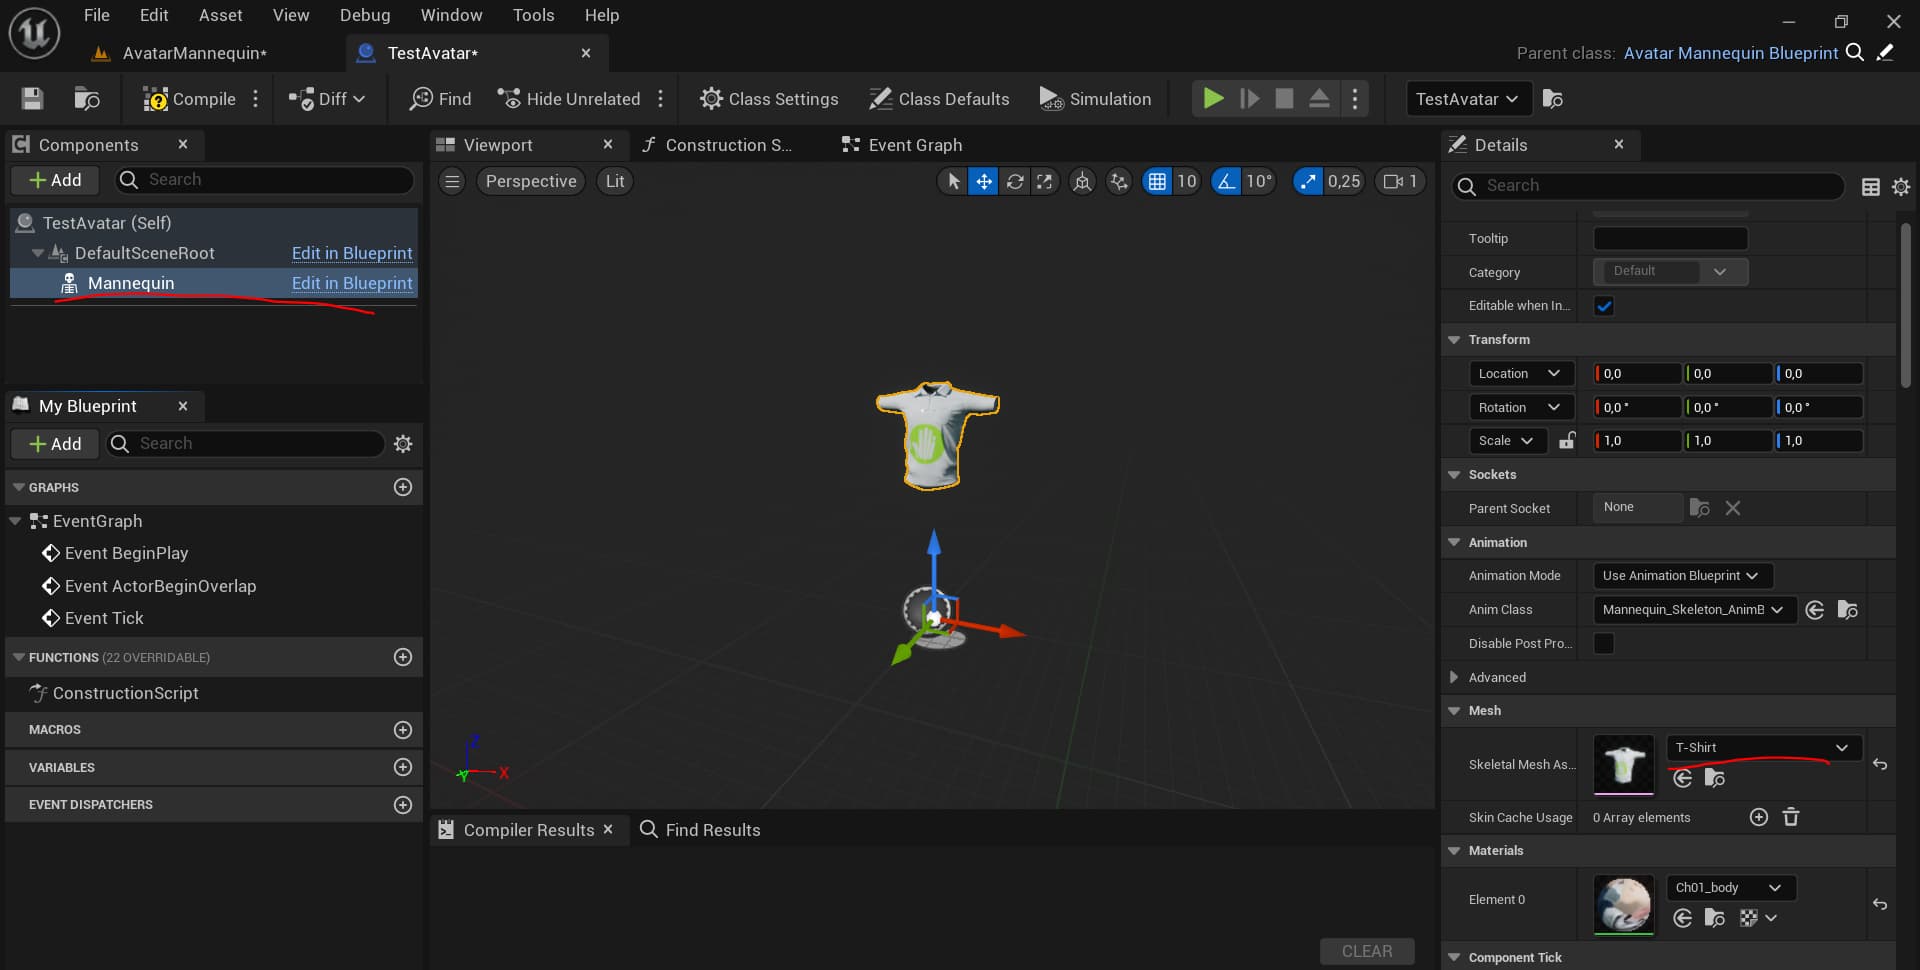
Right click on “AvatarMannequin” blueprint. Select “Create a Child Blueprint Class”. Rename it, for example, to “AvatarTest”. And put it on the level. Make sure it is in location 0, 0, 0. And has a rotation of 0, 0, 180.
Open “TestAvatar” blueprint for editing. Select “Mannequin” in components. And select your mesh in “Skeletal Mesh Asset”. (T-Shirt just for example)
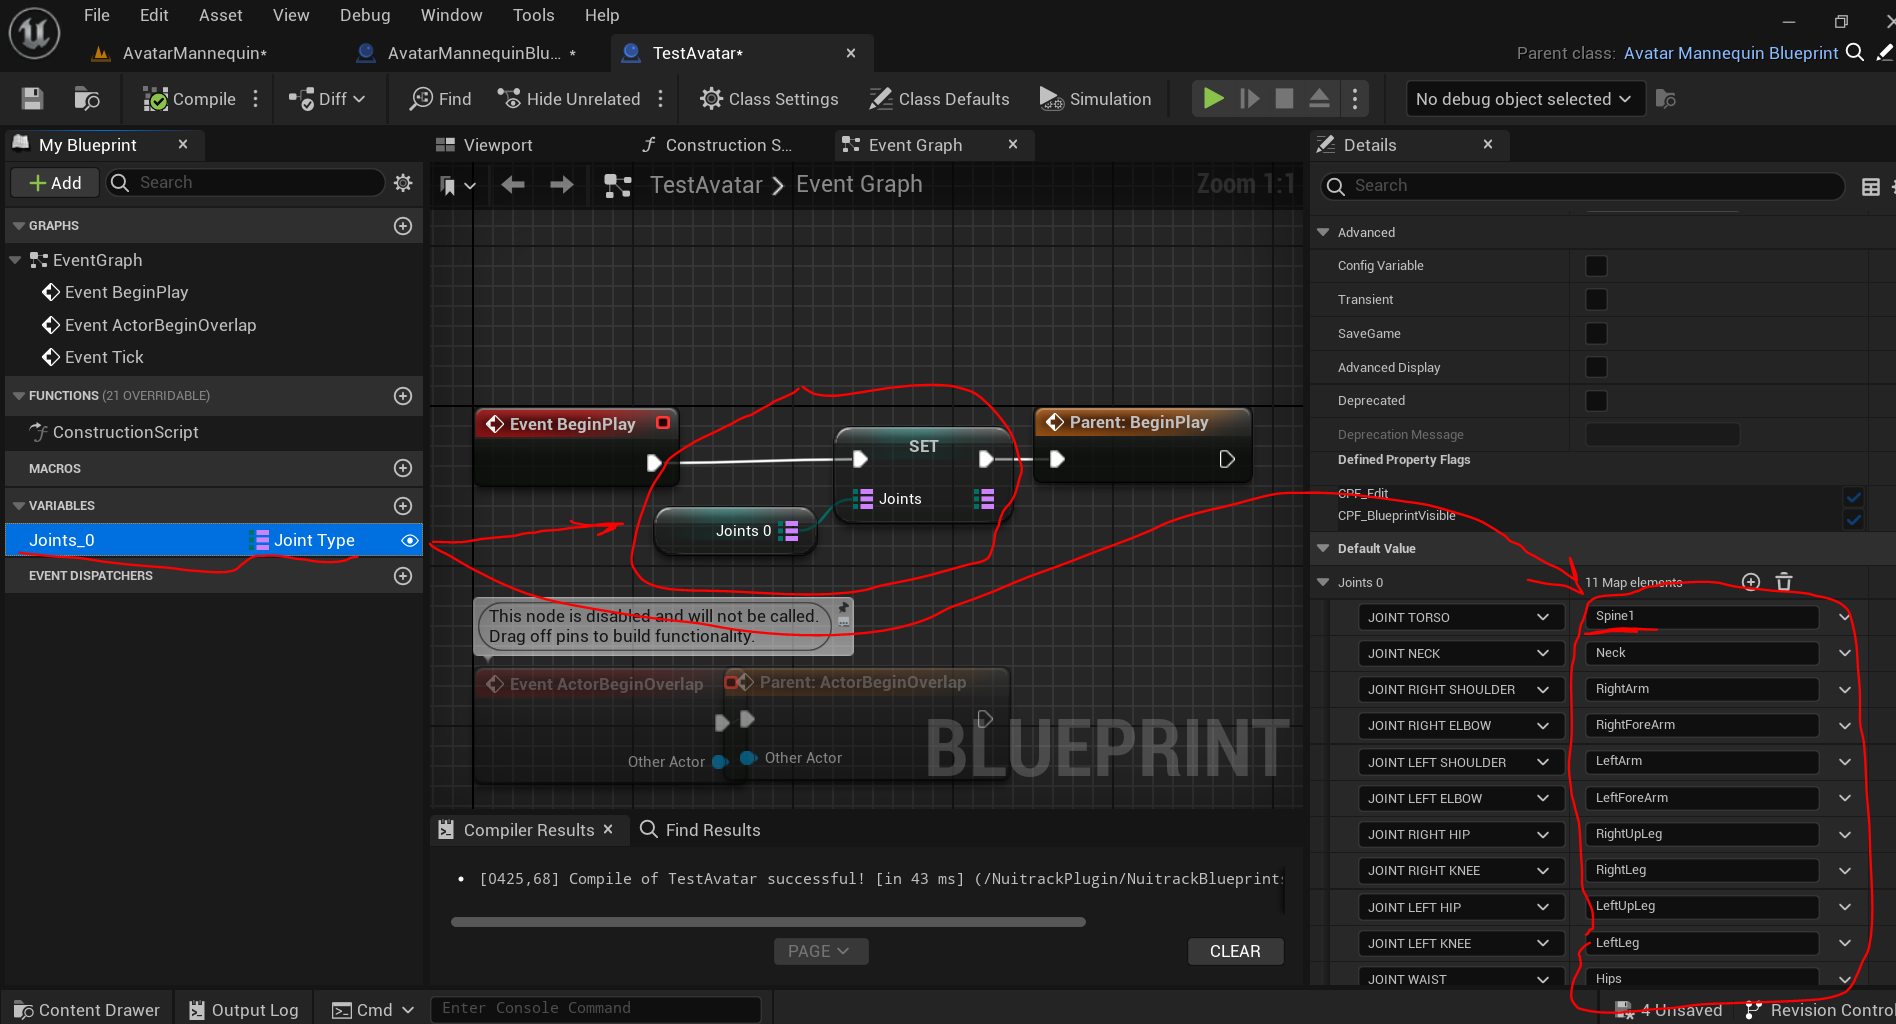
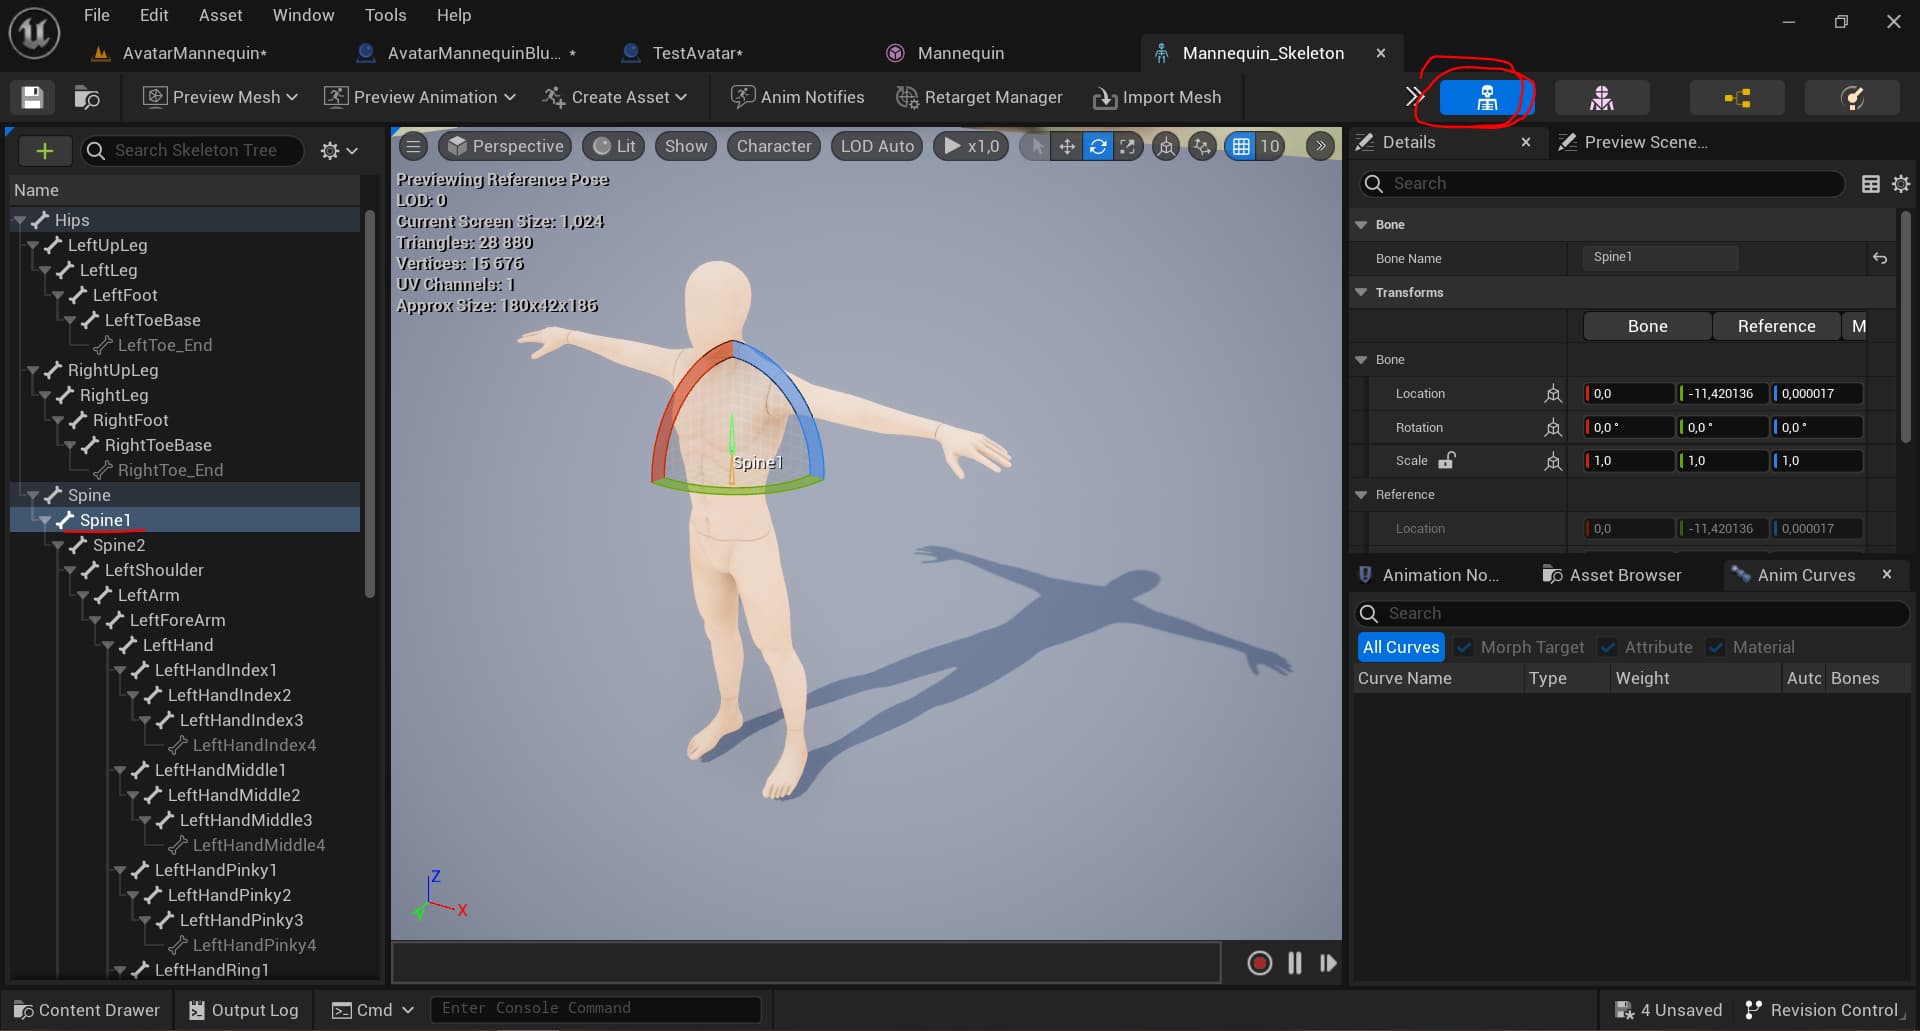
Open Event Graph and Copy variable “Joints” from Variables in Blueprint “AvatarMannequinBlueprint”. Bitween “Begin Play” and “Parent: BeginPlay” set “Joints” with new “Joints_0” variable. In “Joints_0” in first column stored Nuitrack Joint Types, in second column contains the corresponding names of the bones in the mesh. If necessary, they will need to be changed, just write down the actual values in these fields that can be viewed in the “Skeletal Mesh Asset”
Depth sensors have depth data, why not use it to create great visual effects?
The new version of the plugin adds the ability to use thousands of 3D points in the Niagara particle system.
There are two levels for self-study.: NiagaraDepthVisualization и NiagaraLightDemo
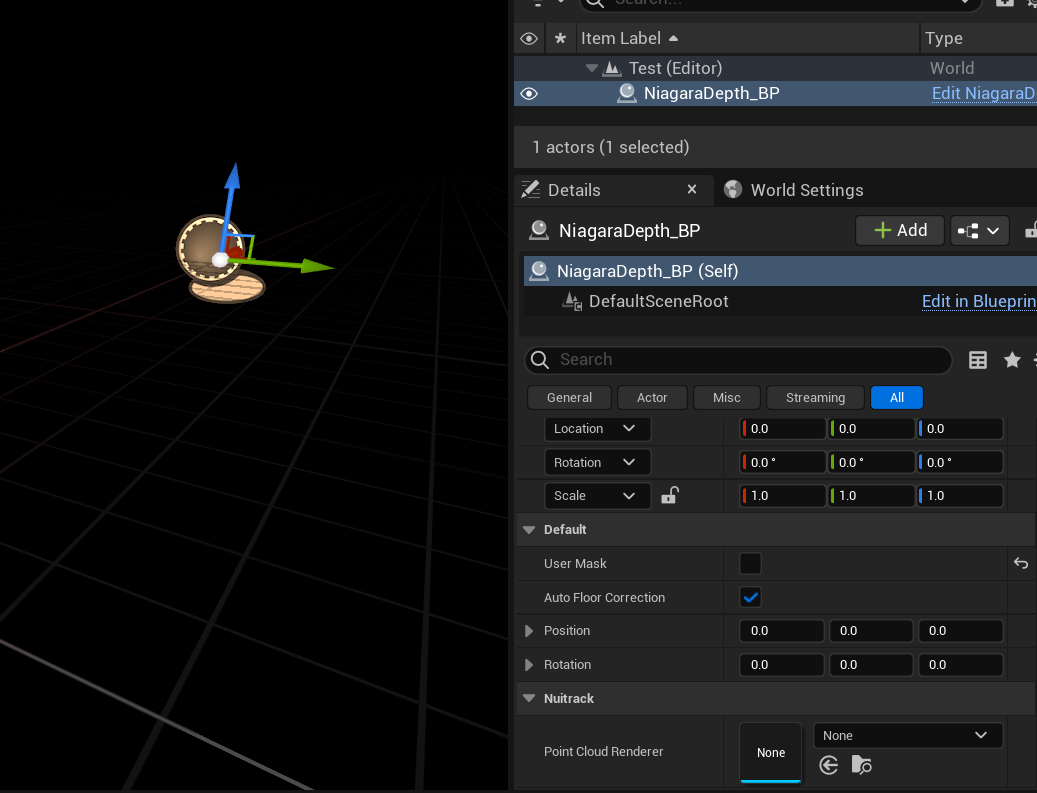
Add BP_NuitrackManager (NuitrackPlugin/Content/Blueprints) and NiagaraDepth_BP (NuitrackPlugin/Samples/Depth/Niagara/TechDemo/Blueprints) to the scene (make sure location and rotation have zero values). Disable the User Mask
Let’s test it.
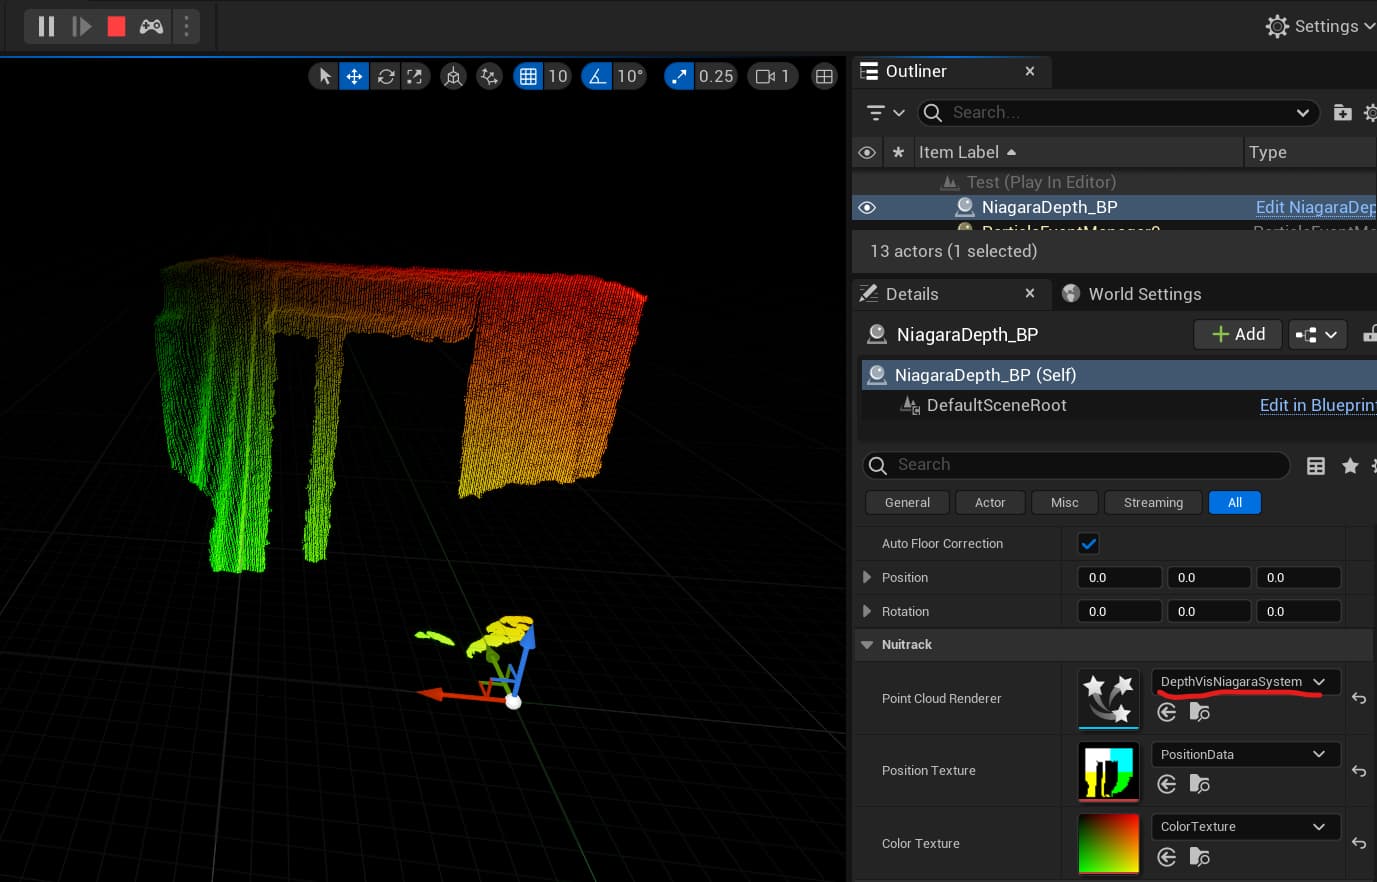
In the Point Cloud Renderer field, select the DepthVisNiagaraSystem particle system.
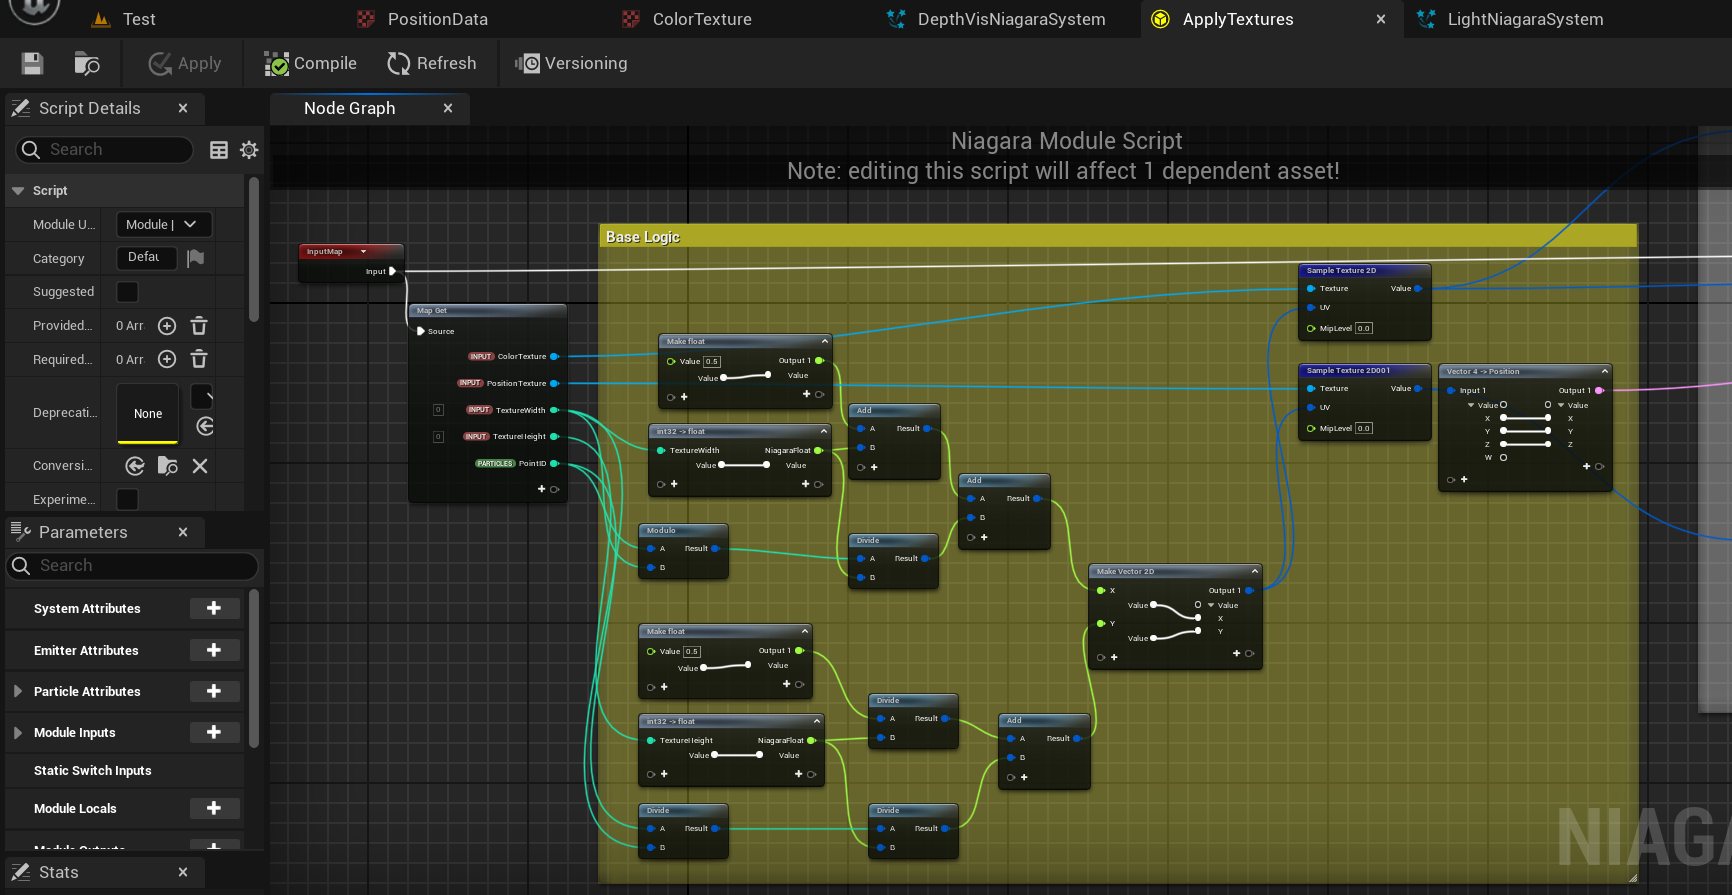
After launching the scene in the viewport, you will see a point cloud, and in the details tab, the textures on which it was built.:
Postion Texture - each pixel contains information about the coordinates of a point in space (Channel G = Y = depth, Channel R = X, Channel B = Z)
Color Texture is a gradient that colors the point cloud. If user mask is enabled, it becomes a mask where each pixel of the background has a value of 0, 1 user has a value of 1, 2 user has a value of 2, etc.
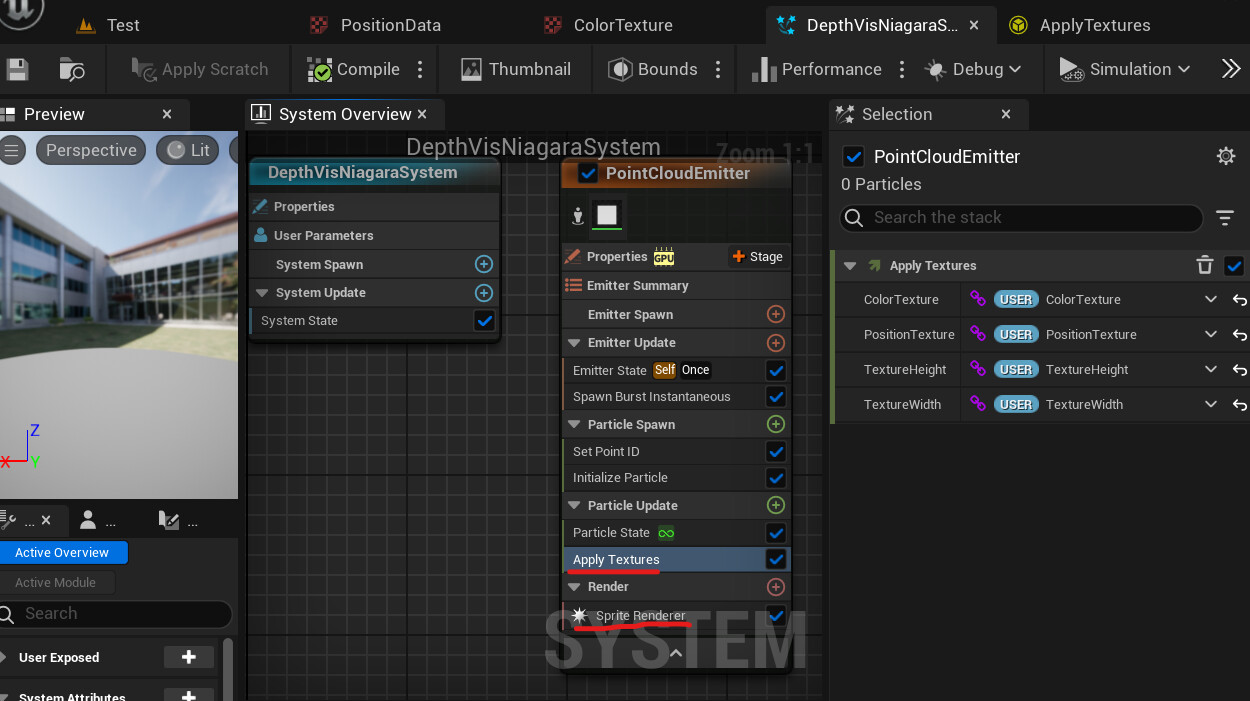
Let’s open the DepthVisNiagaraSystem. Here the general rules of behavior for the particle system are set.
This implementation uses sprites, so sprite renderer is used as the renderer (you can see the implementation with mesh renderer in LightNiagaraSystem (Light Guy Demo))
The Apply Texture module defines the rules of behavior for each particle. Note which parameters are passed there (Position Texture, Color Texture, Texture Width, Texture Height. All these parameters are transmitted automatically)
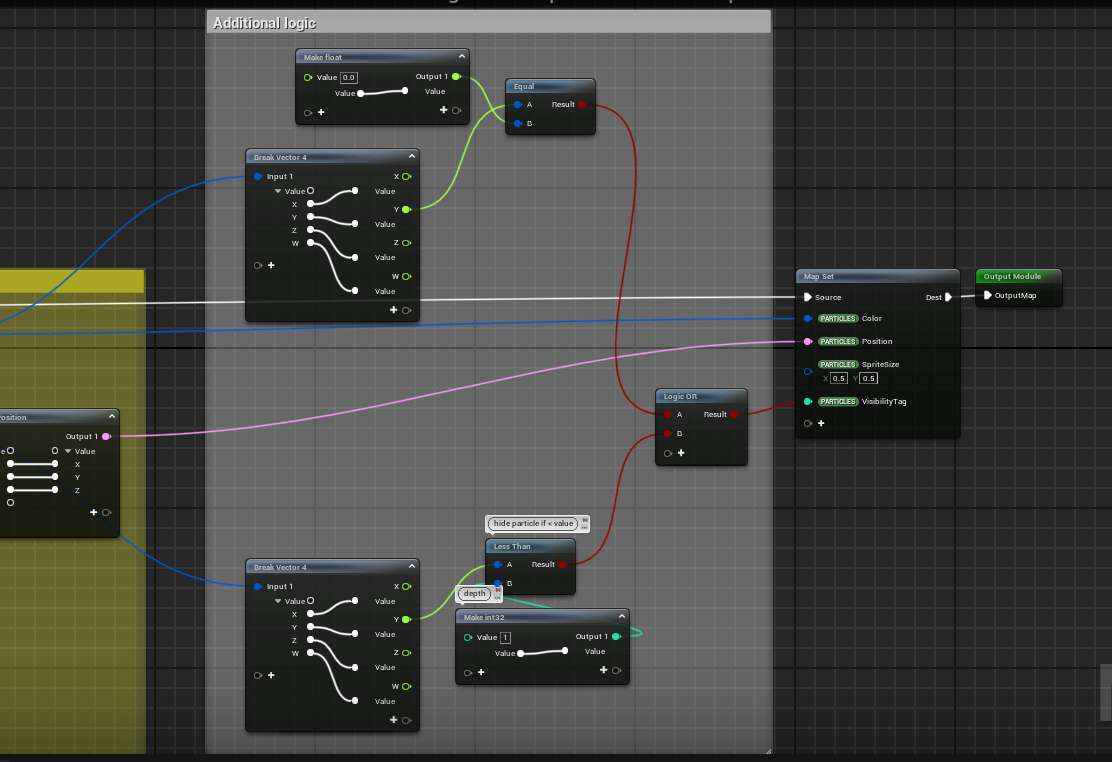
Additional Logic - here you can set any desired behavior for the particle. For example, here we hide particles if the pixel value on the depth map is < 1 (a depth that = 0 is an incorrect depth and it is better to hide such particles) and also, if user mask is enabled, we hide all background particles (with a zero value on the Color Texture)
Copy the DepthVisNiagaraSystem and Apply Texture to create your own interactive particles based on them.
On the level, select NiagaraDepth_BP and replace the particle system with a new one
In the new particle system, replace Apply Texture with a new module (If you want to use a mesh instead of a sprite, replace Sprite Renderer with Mesh Renderer)
Open a new module and try to change some parameters in terms of additional logic, such as color or particle size.


 | How to Start")